Me2014

Me2014
Hi! Thanks for stopping by my blog. I'm Kristi, born and raised in Southern California. I've been into makeup since I was little. Makeup has always been a release to me, but not an obligation. I wear it when I want to, not because I have to and when i do wear something, I like to know it's gonna work... so I research. I'm self taught and love sharing what I find, whether that be a new product, a new makeup look, a new technique for applying, nail art, nails tools or places to get your beauty products cheaper. I hope you love reading these as much as I love writing them. Again, thank you so much for checking out my blog!!

Sunday, October 19, 2014

Halloween Makeup Look: Witchy Woman


Hey Guys!! So many Halloween tutorials coming out and while I love the looks and pick up techniques, they aren’t practical for your average “once a year” Halloween wearers. As I’ve said before, I’m not a costume kind of person, Halloween is more about passing out candy than dressing up. I gotten a few people asking for makeup that doesn’t just look good but isn’t super time consuming or expensive. Here’s what I came up with. Side note: I did half my face because I like the automatic before and after it provides… and takes half the time. 

For this look, I took inspiration for this look from pictures I had seen on Pinterest and Google Images, when searching “Green Witch Makeup”. I guess the REAL inspiration would have been the fact that I found green cream Halloween makeup at Target for $1. I could have gone more zombie but I went witchy. My references were honestly pretty obvious; A little Maleficent with a little pin-up vibe and added some contouring to give the look dimension. 

How I did the Face:
I primed my face with Benefit POREfessional. For the overall face color, I mixed my Urban Decay NAKED skin foundation with equal parts of the green and applied with a makeup sponge to half of my face, excluding my eye area. After I got it where I wanted it, I mixed in a bit of white and sponged that on my under eye, my jaw line and down my nose, just to give a subtle highlight. I set it with translucent powder and moved on to contouring. I used Wet ‘n Wild eyeshadows in black (for contour) and a frosty olive green (for highlighting). To blend it out, I used a little bronzer but JUST to blend, not so much to deposit color. I contoured the cheeks, around the hair line, under the jawline and my nose. Next were eyes. I primed my lids with Too Faced Shadow insurance and applied NYX Jumbo Pencil in Black Bean, blending out into a winged shape. I used a vibrant grape color from my 120 palette on the lid and the same Wet ‘n Wild Black for the outer “V” and crease, extending out. For eyebrows, I lined JUST inside my natural shape and created a curved "flick" on the inner corner to give me a more wicked look. I lined by eyes in an extreme wing using a gel liner and used a black pencil liner on the inner rim of my eyes, smoking it out slightly with black eyeshadow. Lips, I outlined with a black pencil and filled in with a red lipstick. JUST because I felt my forehead looked lonely and I had NO desire to draw a “witches wart”, I used the same black pencil to draw a widow’s peak. 

I have to admit, I started this look not really knowing what it would end up looking like and I’m kind of liking it. Styling a witch costume is pretty easy, I’ve seen witches hats at drugstores and Dollar Trees. All you’d have to do after is wear black, which can be casual or sexy depending on your mood. The possibilities are endless. 

If you try it, tag me in your photo, I’d love to see it! Hope you enjoyed and until next time, I’ll see you later!!

Follow me on Twitter, Instagram and Facebook: @Kristi4t3

Wednesday, October 8, 2014

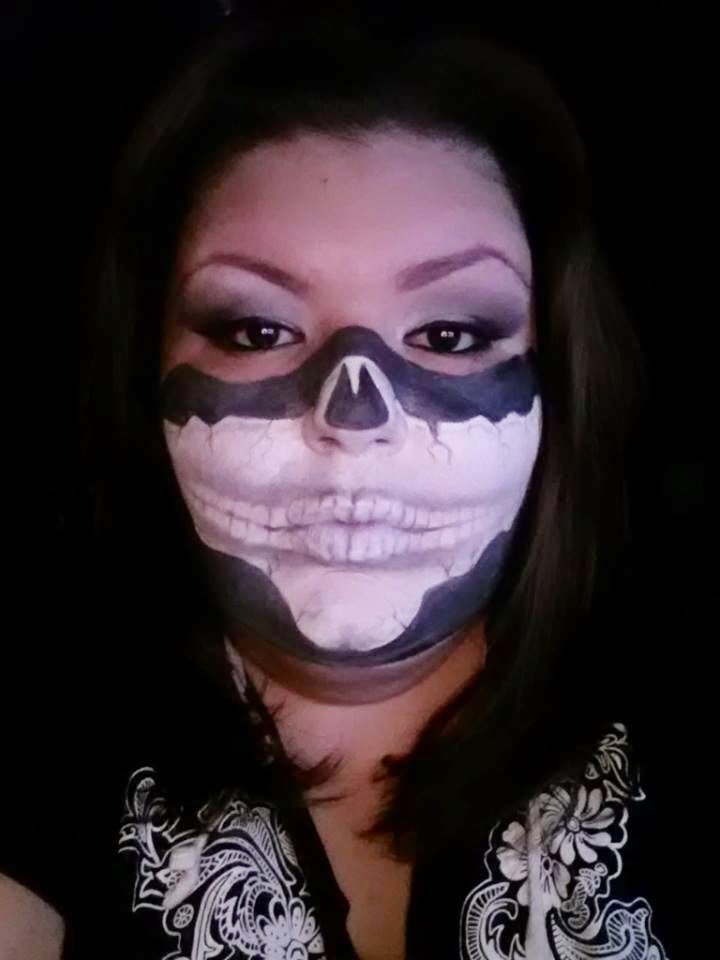
Halloween Makeup Look: Skeleton Half-Mask

Hey Guys!! Halloween is upon us so I wanted to do some makeup. Just by nature, I’m not a costume kind of person so Halloween in my world is more about passing out candy than dressing up. I do, however, love me some makeup and have been to a few festivities where I’ve needed to be in “done up”. 

I’ve seen a couple different versions of the makeup I did from Instagram and YouTube but my problem was that they used professional face paints (like Kryolan, Graphtobian or Mehron) and I’m doing these on a budget. I found white cream face paint at Target for $1 and I also used the NYX Jumbo eyeshadow pencils (for $1.99 each) in Milk and Black Bean. Other than those 3 cream bases, I used Wet N Wild eyeshadows in black and grey/silver. 


How I did the mask:
I primed my face with Benefits POREfessional (personal preference). For the mask, I started with mapping out where I wanted to paint and filled the whole area in with the white cream face paint. I used a thin coat and then went for a second one (which I wish I would’ve done one thick coat because I had to do a lot of touch ups because the second coat would lift part of the first coat). I set it with a translucent powder I had on hand by Makeup Forever but you could get the ELF one for $1. Then I went in with a black eyeshadow on a thin angled brush and drew the outline of the skull part, the nose and the mouth line. Starting at the middle, I drew lines for the teeth. Then with the grey/silver, I capped off the teeth with half circles and began shading. Then taking the black bean NYX pencil, I colored in the negative space using a flat stiff eyeshadow brush to blend it out so I didn’t use TOO much product. I achieved the cracks on the outer portions using the flat angled brush with a tiny bit of black eyeshadow, but mainly pulling the black cream base into the white. 

For the eyes:
I used the same NYX Jumbo eyeshadow Pencil in Milk to prime. On the lid, I used the Silver Wet N Wild eyeshadow. With a fluffy brush, I blended MAC Soft Brown into the crease as a transition color to help me blend. Then, taking a pencil brush, I applied MAC Carbon to the outer half of the lid, blending into my crease and slightly above for a dramatic effect. I used gel liner on the lid to achieve the wing and Urban Decay Perversion 24/7 liner on the water line, blending it out with a pencil brush and MAC Soft Brown. A couple coats of mascara and some brows and that’s it.

I love this look because it’s a costume without the costume. The whole thing took me about 45 minutes while I was watching Dance Mom’s (don’t judge me). You could do up the hair pinup style and make it more girly with an edge, you could play it up with colors and use white and blue instead of white and black, you could use this on a man or woman… it’s just really versatile. 

If you try it, tag me in your photo, I’d love to see it! Hope you enjoyed and until next time, I’ll see you later!!


Follow me on Twitter, Instagram and Facebook: @Kristi4t3

Wednesday, July 16, 2014

Makeup Look: COMPLETELY water proof makeup

This isn’t the kind of blog post I would usually write about but I have to admit, I was really impressed and wanted to share. My grandfather recently passed away and it was really hard on me, which it would be for anyone who’s lost someone dear to them. When it came time for his memorial service, I wanted to be dressed up, made up and super cute for him, but I knew I would cry so I needed some waterproofing.

I tested a couple looks, Snapchatting them to my baby sister who approved or rejected the looks. Then, I used Visine, put a couple drops in my peepers to simulate tears to see how it would react. EPIC FAIL! I used primers and shade sticks, water proof pencils and gel liners but the effect was BAD, black all over my eyes and running down my face with the black tears. It occurred to me, after all the trial and error, that I didn’t have water proof mascara on. In a panic and with no time, I ended up borrowing my mom’s mascara and started my look again. Here’s what my “day of” makeup looked like AFTER the service. Mind you, I went pretty light on the makeup JUST in case my look didn’t work.  Sorry for the sad face, but I don’t have to explain that one.


Here’s what I used:

  • Face: 
Benefit POREfessional Pore Minimizing Primer (on tzone )
Makeup Forever Photo Finish Light Primer (on outer portions of my face and neck)
Loreal True Match Lumi in N3 Natural Buff
Revlon Age Defying Concealer in 02 Light Medium
Rimmel Stay Matte Powder in 004 - Sandstorm
MAC blush in Pinch O’ Peach

  • Eyes:
Lorac Behind The Scenes Eye Primer
Maybelline Color Tattoo in 35 Tough as Taupe
MAC eyeshadows (Wedge all over, Shadowy Lady in the crease and outer “V”, Satin Taupe on lid, Blanc Type as brow highlight, Coquette for brows)
Makeup Forever Aqua Black Waterproof Cream Eyeshadow (as eyeliner)
Maybelline THE TURBO Volume Express Waterproof mascara in Very Black

  • Lips:  (for some reason they look kind of grey in the picture but they're not)
MAC Lip Pencil in Stripdown
MAC Lipstick in VIVA GLAM V
MAC PlushGlass in Ample Pink

Overall, this makeup look was pretty simple but still looked done up. I cried, as expected. I had  no major (or even minor for that fact) malfunctions with my makeup. About 2 hours after the service, I checked my makeup and everything was in place, no creasing, no blank spots and no touch ups needed (other than lips).  Of all the products that I used, the stand out “STAR” would have to be the Mascara. I’ve never been a fan of waterproof mascaras, but this one? I love! Now I have to go buy my own.

Hope this helped anyone who’s looking to go to a party or wedding where they need their look to be SUPER waterproof. Until next time, I’ll see you later!

Saturday, July 12, 2014

Nail Candy: REVIEW - Fing’rs Nail Polishes

Those who know me know I have far too many nail polishes for someone who doesn’t do nail that often, but I always feel like I’m just one or two polishes away from having every color. My mom and sisters are always tapping into the stash, which is conveniently displayed on my wall, for colors but my mom recently had been complaining I had no “Neon” polishes. I had never really thought of that.


When it comes to how I paint my own nails, I prefer a nude colors or darker jewel tones. I do however like to do nail art, quite a bit actually and that’s where all the other colors come into play. Point is, Neon’s never really called my attention but now with this knowledge that my collection was “MISSING” them, you know I had to go out and buy some. Luckily, it didn’t break the bank. 


I found Fing’rs Heart 2 Art collection. I usually associate Fing’rs brand with decals and nail art but not polish. This made me shy away from them at first but no other brand in the Walmart nail section had all the colors I wanted, so I caved. I did tiny swatches on my nails and WOW. For the most part, they’re pretty opaque and fast drying. I bought 5 of the 8 colors available (picture below). There wasn’t a purple I liked (the one that was called “Grape” was more magenta/fuchsia than purple) so I veered to Sally Hansen and the blues were really similar to shades I already had. There was also a glitter coat in the line but it was sold out in the store. The only one that I did purchase that I feel could be better is the green called “Meet Me in the Green Room”. It takes about 3 coats to get the color you want but if you have the time, then you can get the color. Another thing I didn’t expect is they all dry to a pretty matte finish. I don’t mind that so much but I feel like it should say it somewhere on the bottle.


Overall, I like these nail polishes. They’re super summer appropriate and fun, they’re available at drugstores so they’re easy to come by and the price is right around $2.00 each. I would totally recommend these to anyone looking for bright colors on a budget.Just incase, here's the link where you can find them online:


Hope you enjoyed the review and let me know if you end up getting them! Maybe I’ll show some summer themed nail art in a future blog using these. Until next time, thanx for stopping by and see you soon!


Thursday, June 5, 2014

Blushes: How to choose one for you, how to apply and anything you want to know!

I asked on my friends on my personal Facebook if they had any questions or problem areas that they would like to see a blog or video on. Choosing blushes was the first one. Here are some of the things I’ve learned about blush from my own trial and error, and a little research.

My first memory of blush was back in elementary school. There was this mom who would  pick up her kids. She had short vibrant red hair and her makeup was intense. She used a dark, shimmery, reddish-brown eyeshadow that winged out and went all the way up to her eyebrows and what seemed like the same color on her cheeks in a line from about her mouth to her ears. She blended everything so I don’t remember harsh lines, more of an intense color that blended at the edges. None the less, with the hair and the eyeshadow and contour all being the same color, she had the appearance of a Disney villain. 

As I got older, my mom tried to explain to me the concept of blush and contouring; use a brown shade to make your face look thinner and put the pink over the top to make you look pretty. When it was finally my time to start wearing makeup, I completely abandoned the idea of blush all together. I naturally have rosy cheeks so it seemed like a waste of time. Then I started using foundations and powders that evened out my complexion and all of a sudden, my rosy cheeks were gone. Blush became a good idea. When I started working, I went to the MAC counter and asked for help. She explained a general rule; "Any blush can work on any skin tone, it just depends on your application. You should look at your skin color. If you have cool undertones (more pink/fair skin), you want to use a rosy pink shade. If you have warm undertones (more yellow/olive/tan skin) you want to use a coral color. For neutral tones (where you face is neither too pink or too yellow) you can use either". So, I bought a coral blush (MAC Peachy Keen, which is described on their website as a very baby peach). Since that first blush, I’ve realized that the same color doesn’t always go with whatever makeup look I’m wearing. I later bought a pink toned blush and went home to research. I found on a blush palette on the BH Cosmetics website that had 10 blushes for under the price of one MAC blush. I bought it and experimented. I now had options. My adventures in blush let me to these few conclusions:

- Different kinds of blushes: There aren’t just colors, there are finishes and types. Colors range from pinks to purples, oranges and vanilla shimmer, reds and corals to browns and mauves. Powder blushes are most popular and readily available in any brand of makeup. The selection of finishes run from matte for a more natural wash to shimmers and glitters for that extra sparkle for a night out. Because of their dry nature, these tend to set and work with the oils of your skin as the day goes on. Then there are cream blushes which usually come in either a stick form (like a large lipstick) or a pan. These are good because you just dab a little on the cheeks and blend in with your fingers. They can also give a natural finish and are easily buildable based on your application. I wouldn't recommend these for oily skin as they may tend to move as the day goes on and the product reacts with your body heat. They can be set with powder to ensure staying power (but essencially that would mean you're double blushing). Another option is cheek stains, which run along the lines of the cream blushes but are meant to literally stain your cheek, much like if you used a lip stain. These provide a wash of color that stays put. They're usually better for bare skin or light/sheer makeup. Using these with a full coverage makeup doesn't seem to make sense (at least to me) as it wouldn't lay directly on the skin and the "stain" aspect wouldn't make so much sense. 

- Your blush brush makes a difference! Most drugstore brand blushes come with a small brush. I’m not a fan. My suggestion? A larger blush brush. For a defined look, use an angled blush brush. I would recommend for this application to use a synthetic brush (this info can be found on the package or can be provided by a sales clerk). The bristles of these brushes don’t hold product (since the material is non-porous) so whatever you put on the brush, goes on your face. For a softer wash of color, use a fluffy powder brush. I recommend using a softer brush for this, maybe natural hair or dual fibered. This way, you’re picking up color and the bristles are both depositing and defusing the color on your cheeks, giving you a wash of color. This technique is what I would suggest for a natural every day look. 
- Lastly, for a natural look, my best suggestions would depend on the foundation or face makeup you use. If you use just a face powder to even out skin tone or eliminate shine, I’d go with a powdered blush in a matte to satin finish with a fluffy powder brush in a shade suited for your face based on your undertones. If you use a BB/CC cream, I would go with either the same technique as the first suggestion or a cream blush. Use the tiniest bit on your finger, apply in a circular motion without over working the product and then blend back. This will give you that youthful rosy cheek look and blending it back will eliminate the circular doll look. Key to natural looking blush? Blend blend blend!

All in all, it’s a lot of information but hopefully it helped. I'm putting some suggestions that I personally love when it comes to blush and the links to find them at. Thanks so much for your time and I’ll catch you later!


MAC Cosmetics - Cheek section of their website 
I like Melba, Peachy Keen, Desert Rose, Peaches

(Go to an Ulta or Sephora store, have them try the blushes on you... ask for a sample and try before you buy. Then you're not blindly making any choices, you can come back and purchase what you like)

Sunday, May 11, 2014

YouTube Quick Tips: Makeup Brushes

This is something I like to do for people who don’t have the time to sift through all kinds of “gurus” on YouTube trying to find something useful that they can apply to their daily makeup routine. I watch all kinds of videos online and I know how hard it can be to come across something that isn't too specific to the look, but rather educational. I'm going to highlight videos that deal with an issue I’ve come across or been asked about that are more "How to". 

For this installment, I’m tackling brushes. I think it’s the questions I get asked the most because when you start getting into makeup, you assume that buying the expensive products gives you that flawless look. I want to emphasize that it’s not always the makeup but the way you apply it and not only eyeshadows but with your full face of makeup. I know because that was the route I took. 

I walked into a department store, saw SMASHBOX and was amazed. They did my sisters makeup and I thought, OMG! I have to go back and buy it all. Well, I never did but much later, I ended up in a Macys with my friend who introduced me to MAC. I went NUTS. I remember my first eyeshadow was Electric Eel (bright turquoise blue) and when I got home, I have no idea what to do with it. I went back to MAC and they saw that look in my eyes and POW! Four hundred dollars later, I got my first 10 eyeshadows, foundation, powder, Fix+ and brushes. All of a sudden, makeup was attainable because these brushes made it so much easier to apply and blend and look like these girls I’d see pictures of online. Had I known then, what I know now, I might have still spent the money on the brushes but EH… maybe not so many eyeshadows.

Either way, knowing what brushes do and what to look for when shopping for your makeup bag REALLY makes a difference. Here are 2 videos I found that explain what brushes are, where they are best used, the brands these girls like and in some cases, cheaper alternatives to MAC. 


First video is by Marlena – Makeup Geek. She is a self-made makeup guru who owns a company that offers great products at great prices. Her company “MakeupGeek.com” offers quality eyeshadows and brushes. In this video, she goes over each brushes functionality, compares it to a higher priced option and gives you her opinion on which is a better buy. This should help you out when looking at brushes online wondering which to buy and why you would pick one over the other, which she explains in detail. Here’s the link to that video:


Next video is by Jaclyn Hill. She is a professional makeup artist. She gives you the rundown of what brushes she uses, what she uses them for and why they are better for certain uses. She also goes over brush hair, which can sway your decision on brushes. Prior to this video, I had never really considered that. She gives you insite, being that she’s worked for MAC and now collaborates with Sigma Brushes, which in most cases is a cheaper alternative. Keep in mind, this video is a little long but VERY informative. Here’s her video:


Another topic that comes up with concern to brushes is how to clean them. There are all kinds of liquid brush cleaners ranging from $5 to $30, some better than others. Jacyln Hill touches on how she cleans her brushes at the beginning of her video but I wanted to provide another option that uses household items or at least products that are easily attainable. Here is a video by Nicole Guerriero that’s short and sweet showcasing how she cleans, conditions, disinfects and dries her brushes. Here’s the link to that video:


As for myself, most of my brushes are from MAC, Urban Decay, Stila and I have some random ones from Sonia Kashuk, Real techniques and so forth. When I clean my brushes, I use the MAC Brush cleaner in a little $1 squirt bottle with half water and spray them, rub them on a paper towel and set them flat to try. When I’m deep cleaning them (which is not SUPER often, being that I don’t do my makeup all the time), I use sensitive formula baby shampoo, run them under warm water, then dip them in the MAC cleaner to get any stains the makeup might have left on the brush out and let them dry flat overnight. I don’t really have input on the types of brushes I have, being that I have quite a few and a version of most of the brushes mentioned. I think I have a pretty well rounded collection. 

Hope these videos helped with any and all questions you have about makeup brushes. Feel free to ask any questions you may have and I will do my best to answer to the best of my knowledge. I might even research it and use your question as my next YouTube Tip. Thanks for checking in!